
Being Geek Chic is a blog about one woman navigating the male-dominated industries of production and tech. It's written by Elizabeth Giorgi, Founder, CEO and Director of Mighteor - one of the world's first internet video production companies. Learn more about Mighteor here.
![]()
![]()
![]()
![]()
![]()
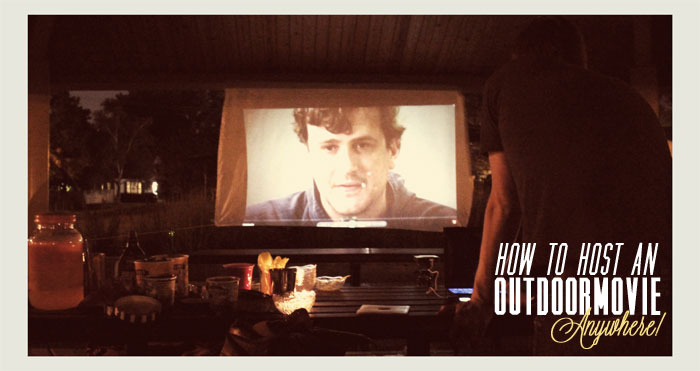
I have always, always loved outdoor movies. I’ve also loved the idea of hanging a sheet in the park across the street and chowing down on popped corn while taking in the crickets and a flick.
Using the new Brookstone HDMI Pocket Projector, I was finally able to test this out myself.
Here’s the results:
Want more information on the projector? Find my full review here.
A couple notes about watching movies this way:
Make sure you have unlimited data on your phone OR access to WiFi. Streaming HD video eats up the data.
The projector we used has a battery life of about 2 hours, so you need to pick a movie with a running time less than that.
Iron your sheet! I bought the Knoppa Twin Sheet at Ikea, but it was a wrinkly, wrinkly mess when I took it out of the bag. Wrinkly sheet makes for a wrinkly movie.
Of course, don’t forget the snacks either!
I’ve had science on the mind. Science and jewelry and good manicures. As such, this combination came to be in a form that I am quite pleased with.
This ring is pretty freaking sweet, because it’s on trend for those that care about having street cred with the fashion set, but also has a natural element that geologists and naturalists can totally get behind. There are, however, a few activities I don’t recommend you try when wearing this ring.
No punching.
No cooking.
No typing.
Or perhaps, maybe you should do all those things while wearing this ring!
It serves as excellent self-defense.
I could muddle the shit out of some fruit or veggie with those jagged edges.
If you are desiring finger biceps, a rock this big will give those fingers a workout.
In case you care, the polish on my nails is Deborah Lippman’s Prelude to a Kiss and my ring finger gets some bling-tip love from Essie’s Set in Stone. Ah, to be girly.
I know… get onto the damn instructions, E. Here you go:
1. Buy yourself a geode rock. eBay will be your online equivalent of rock-picking in this instance. Did that work for you already lovers: Here’s a good source.
2. Get yourself some super glue and a ring base. You can buy a ring base anywhere, but I bought this adjustable ring base so I could wear this ring on many fingers. Don’t forget the brush on super glue.
3. Brush some glue on the flattest part of the stone. Brush some glue on the ring base. Place the ring base onto the stone and let it dry for a bit.
Wear it and enjoy!
You need:
A geode!
Ring base
Super glue
5 minutes to assemble
1 hour to dry
Total cost: About $7
I love DIYs that are crazy easy, yet have a big impact. This is one of those. Wearing lots and lots of beautiful bracelets and bangles is really in right now (and not just with fashion bloggers, I promise.) - but if you don’t want to invest a ton of cash on some new sparkle, this project is easy and lets you share a bit of your personality by using comic book art.
1. Pre-string a piece of stretchy cord with half your beads. I used silver and blue faceted glass beads - and here’s a tip - they’re 50% off at Michael’s Craft stores this week, so it’s $2.50 for a 9 inch strand.
2. Scan the portion of your comic book that you want to appear in your charm. You can use a couple different panels or a cover. I think 80s comic book covers are some of the best art out there, so I chose a Thor Journey Into Mystery cover from ‘86 and an Avengers West Coast Annual cover from '89. I scanned them and shrunk them down to about a half an inch. Then, print out two for each side of the charm.
3. Remove the stock photo in the charm and keep it. You’ll need it to stiffen the comic book prints. Tape a copy of your comic book of choice to each side and then trim the excess.
4. Now, use another piece of clear tape to create a lamination effect on the paper. You want to be careful not to touch the tape, because it will put fingerprints on it. Sandwich it in and cut the excess tape off.
5. Slip your comic book into the photo frame charm - being sure not to damage the tape.
6. Now, put your charm on your stretchy cord and finish beading. Tie it off and enjoy!
You need:
Comic book
Printer
Tape
Scissors
Stretch jewelry cord
Beads
Photo frame charm
Needle
20 minutes
Total cost: $3.50 per bracelet (Note: I bought my charm at a Michael’s store for $1, but you can find larger packs online for about the same price.)
If you follow me on instagram (I’m @lizgiorgi!) you know that I’m a bit obsessed. It’s great to capture the smallest of moments alongside the biggest. Plus, it’s all just so beautiful.
Well, when I wrote about different instagram art options for your home, I realized that there was one really basic product that was missing: a cheap canvas option that you could hang in a cubicle or stand up in a set on a desk.
So, I decided to try and make it. They turned out super cute and the best part is that each one costs about $1.13 to make.
Here’s how I did it.
1. Save two photos from your instagram account on your computer. Use a photo editing software or service to create a 4x6 photo canvas. Then, position two instagram prints next to each other at 3x3 inches each. You will have a 1 inch blank area on the bottom of the print, but that’s OK, because in order for this project to be cost effective, you need to get two prints on each sheet of photo paper.
2. Print the photo at home. Take it to the store and print it at a Kiosk. Send it to Shutterfly. Whatever you want! Just get it printed. It cost me 25 cents to make that print at Target, making each photo about 13 cents.
3. Cut the photos. Use a straight edge or photo cutter (like this one) to separate the two photos.
4. Now, grab your 3 inch by 3 inch canvases. Using a photo mount spray glue (not Elmer’s, not tacky, not stick, not super - PHOTO MOUNT ONLY!) spray a thin layer of glue on the canvas from about 6 inches away. I recommend doing this outside, because it’s sticky and gets everywhere.
5. Once dry, trim any of the stray edges to clean up the overall look. Allow the glue to dry overnight before displaying or hanging.
You need:
Two instagram prints
Photo editing software
Photo paper or a place to print photos
Straight edge like a ruler
X-ACTO Knife
Photo Mount Spray (A note on this: yes, it’s expensive. But I recommend waiting for a 50% or 60% off coupon from Michael’s or Joann and buying it then. It will cost you $7-$8 that way and it lasts FOREVER. I have had the same bottle for 2 years and I’ve done about 20 different projects with it.)
Total cost: $1.13 each. I bought my canvas individually, but I could only find the 6 pack online. Either way, you should be able to find them for about $1 a piece at JoAnn Fabric and Michael’s Craft stores.

One of my favorite summer activities is star gazing at my family’s lake place. The calm of the water and the clarity of the sky never fails to make me happy. This DIY is a celebration of that love. Your LCD screen provides the light for making your favorite constellation come to life.
The best part about this constellation iPad/eReader/tablet case? It costs less than a buck to make. Seriously. If you’ve got the tools and thirty minutes, you’re done.
Here’s how I did it:
1. Cut out two pieces of felt in identical shapes with the width and height of your iPad/eReader/tablet in mind. Allow for a half inch seam allowance around three of the four sides. The felt I used is an eco-friendly blend that is very soft and costs less than $.50 a sheet at JoAnn fabrics.
2. Using a very small hole puncher (I used Fiskars Hand Punch, 1/16-Inch, Circle), punch a hole in three of the four sides. Do this for both pieces of felt.
3. Print out a map of your favorite constellation. I used the big dipper. Now use this as a guide to punch out the constellation in the center of one side of your case. Using a larger hole punch (I used Fiskars Hand Punch, 1/8-Inch, Circle), punch out the major stars in your constellation.
4. Thread the edges with a thick yarn. You can do a straight stitch or do something fancy. Have fun with this.
Put your iPad/eReader/tablet inside and turn off the lights. Then, press any button and watch your constellation light up! Fun, right?!
You need:
Two pieces of felt
Scissors or fabric cutter
Yarn needle
Yarn
Hole punches (two sizes) I used Fiskars 12-23508897 Hand Punch, 1/16-Inch, Circle and Fiskars 12-23518897 Hand Punch, 1/8-Inch, Circle
30 minutes
Total cost: The felt was .39 a piece, the yarn, needle and hole punches were on hand.