
Being Geek Chic is a blog about one woman navigating the male-dominated industries of production and tech. It's written by Elizabeth Giorgi, Founder, CEO and Director of Mighteor - one of the world's first internet video production companies. Learn more about Mighteor here.
![]()
![]()
![]()
![]()
![]()
Taking pictures of your pets can be… challenging. And yet, so many people share quick shots of their cats, dogs, hamsters, fish and other cute creatures are all over Instagram. The question is: are they frame worthy pics? If you want to get memorable snaps worthy of framing, here are my favorite tricks:
1. Go where your pets like to go.
This is such an obvious one, but many people miss it entirely. If your pet has a favorite bed, bring the camera near them. If your pet loves to sleep on a specific chair, set up your lighting near it and wait for nap time. It’s important not to force the moment, because everyone (human and pet!) will get frustrated.
2. Get LOW.
We are larger than our animals. Well, most of the common ones anyway. Disregard horses, elephants and very large dogs for this one. Too many people try to get their pet to look up at them, when you should be getting at their level. This often means lying on the ground for a while until you get the perfect snap. But trust me, that eyes in the camera look is worth it.
3. Reduce gear fear.
One of the things my cat really hates is the sound of the flashbulb in my lighting setup. So, I got a continuous light, thus solving a HUGE problem. No additional noise means no additional frights and I get quality lighting on all my shots. Win. Win. Win. Don’t forget about beeping noises on your camera too. If you can disable them, do it. I mentioned in #1 to bring your gear where your pet likes to hang out. This can also reduce gear fear, but BE SURE to move gear when they aren’t in their favorite space. Instead, have it be a happy surprise so they can investigate on their own terms.
4. Be patient.
This is a marathon, not a race. It can take many, many attempts to get even one good shot. I often say: it’s about 100 bad pictures to 1 good one and about 1,000 pictures to 1 GREAT one. If you follow these tips, you will get there eventually.
5. Tricks and treats are always good.
A few treats never hurt any pet. My cat just knows… if she comes down to the studio, I definitely have one of her catnip balls chilling somewhere. As a result, she’ll hang out with me in the studio for hours. If that level of coordination is too tough, I recommend trying this lovely trick from Nick and Schmidt from last week’s episode of New Girl. Maybe avoid the Swuit, though.
What other tricks do you have for getting epic pet pictures?
I’m kind of a weirdo about managing cords. I hate having unorganized cables and nonsense because, frankly, it can also easily get lost or destroyed and replacing an Apple power cord is ridiculously expensive. And really, there is nothing inherently adorable about cord management… But there are definitely some great options out there if you’re willing to hunt and do a little DIY.
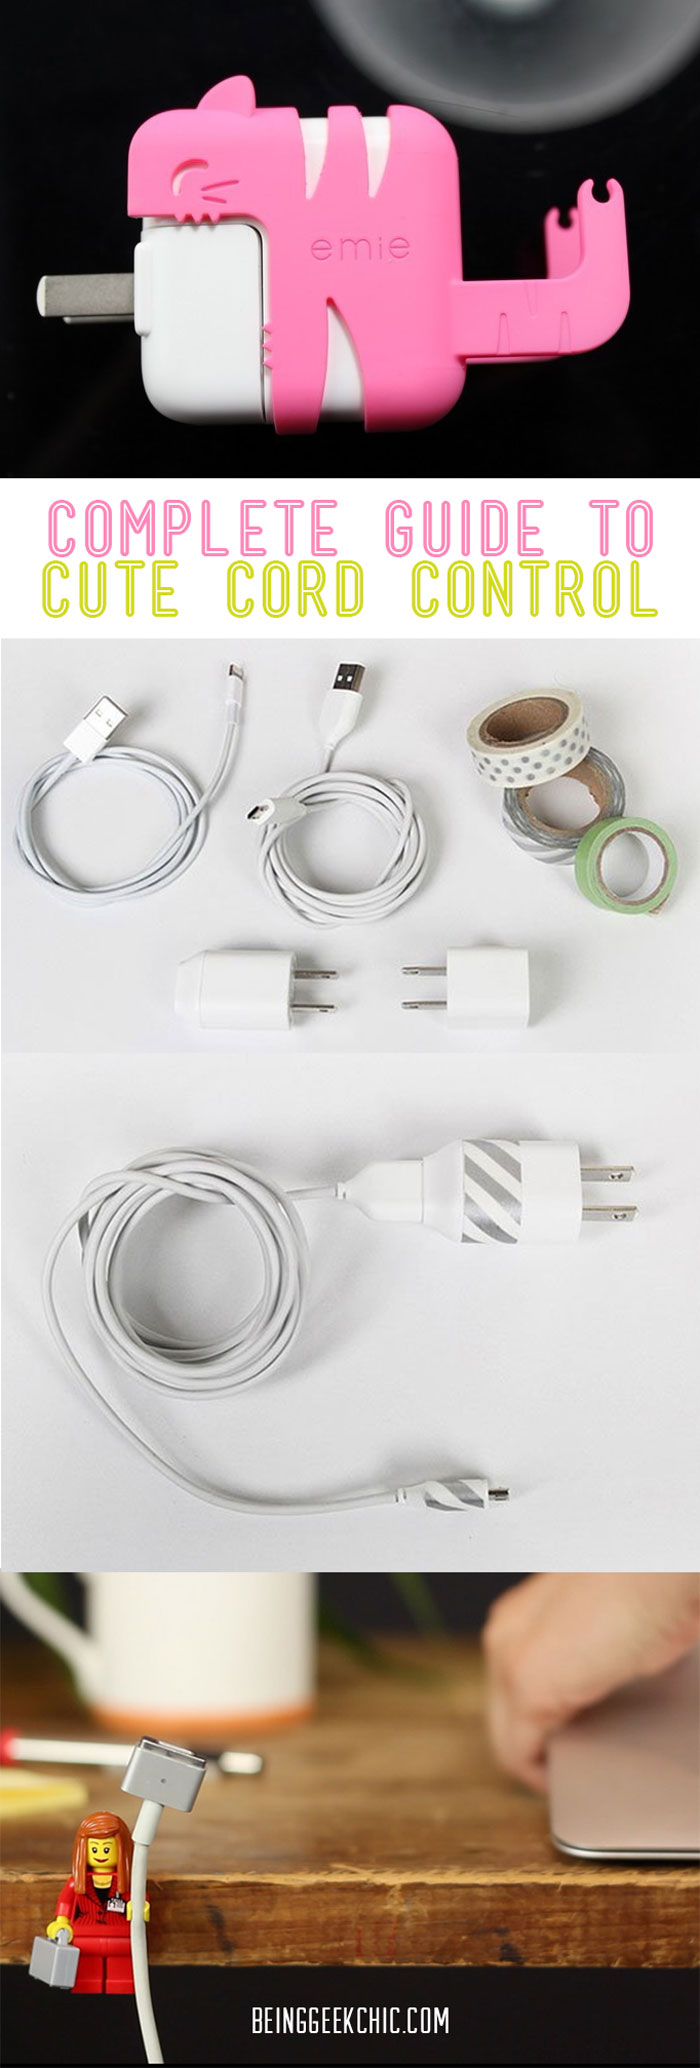
So my first tip is actually a shopping tip. But it’s a good one. Go check out the iCat and iMouse cord wraps/cases for Apple power cords. They come in a variety of sizes, but my favorite is easily the iCat for the MacBook power cord. They are less than $10 and while not the most durable of all the cases, they do make up for it in Happiness Making.
My second tip actually comes from my personal archives. One of the things that commonly happens to me is that I lose track of what cords are for, so I use Washi Tape![]() to label cords according to their devices. Washi tapes comes in so many cute patterns and colors, it would be a shame to miss out on the opportunity to make those cables at least 20% more fun as well. That tip can be found here, but yeah, it’s pretty damn straight forward.
to label cords according to their devices. Washi tapes comes in so many cute patterns and colors, it would be a shame to miss out on the opportunity to make those cables at least 20% more fun as well. That tip can be found here, but yeah, it’s pretty damn straight forward.
My favorite cord trick of the year is easily this one: Use LEGO Minifigures![]() for holding cords in place. GAH! SOOOOOOO CUTE. Honestly, why didn’t anyone think of that sooner? I’m told it stretches the hands out slightly over long periods of time, but hot tip: you can buy replacement hands at the LEGO store or on eBay.
for holding cords in place. GAH! SOOOOOOO CUTE. Honestly, why didn’t anyone think of that sooner? I’m told it stretches the hands out slightly over long periods of time, but hot tip: you can buy replacement hands at the LEGO store or on eBay.
So what’s your cutest cord management trick ever?
Earlier this year, I fell in love with a cat tipi. But I wasn’t so in love with the price.
I am seriously considering spending $50 on a cat tipi. I know My cat literally won’t care. What’s wrong with me?
— Elizabeth Giorgi (@lizgiorgi) August 16, 2014
And so I did what any crafty person would do, I started thinking about alternative ways to make it for considerably cheaper. I figured if I could make it for less than $30 it would be worth the effort. And surprisingly, the home garden department was the answer to my quest.

With the help of a few garden trellis parts, a yard of fabric and about 30 minutes, I made my kitty love a little house. Full disclosure: she loved it way more while it was just three pieces of wood leaning together and a piece of fabric thrown over it. But I have caught her in there a couple times since. These are cats we are talking about after all. She couldn’t possibly want me to actually see her enjoying anything.
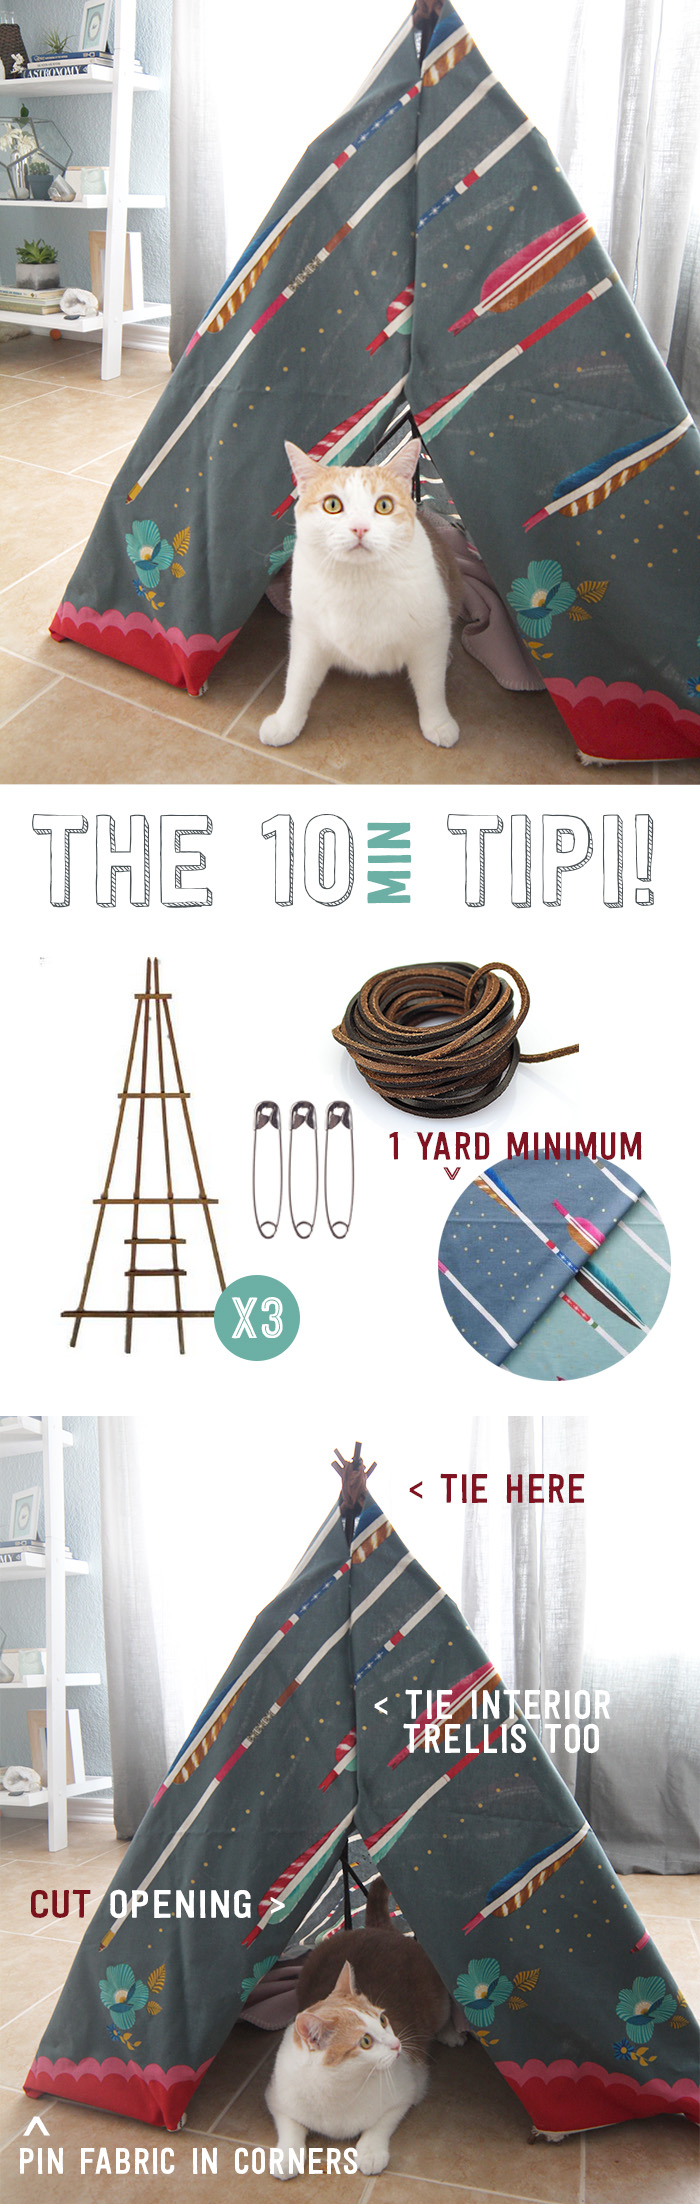
The basic idea is this:
1. Go to your local garden store and look for a 2 foot to 3 foot long garden trellis. They often come in triangular shapes because it’s easier to attach plants in that configuration. Buy 3 of these. Then, tie them together using some leather cording in a triangle.
2. Wrap a large piece of fabric around your tipi and figure out where the opening will be. The opening is going to be on the flat side of one trellis. You will need to either cut out or saw out a triangular opening, depending on the toughness of your trellis.
3. Pin back the corners of the fabric so that the kitty can come and go as she pleases and pin the corners so the fabric doesn’t come off.
I suppose the most important step is to put a treat inside so she’ll be compelled to check it out. Or her favorite blanket… as Miss Alice would demand.