
Being Geek Chic is a blog about one woman navigating the male-dominated industries of production and tech. It's written by Elizabeth Giorgi, Founder, CEO and Director of Mighteor - one of the world's first internet video production companies. Learn more about Mighteor here.
![]()
![]()
![]()
![]()
![]()
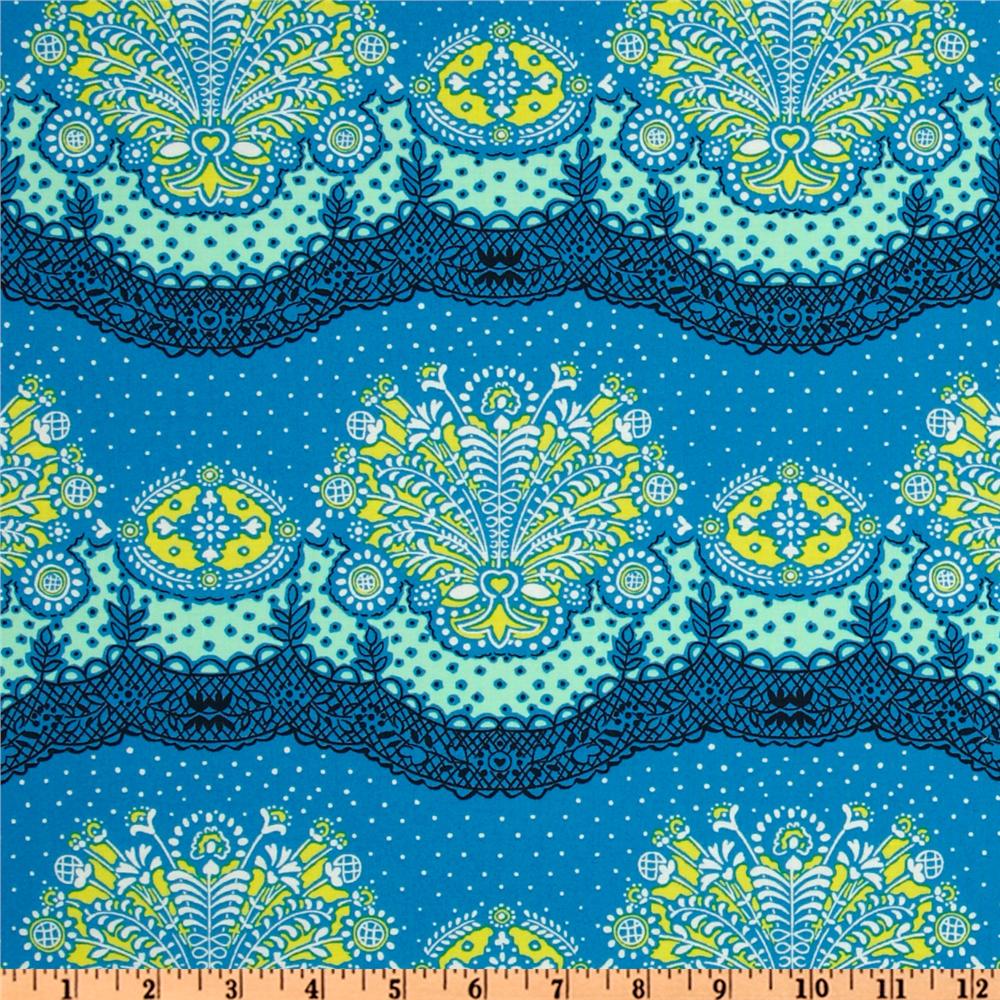
I’ve been trying to find the “perfect” Sherlock Holmes-inspired pillow for my home for months and months. I’ve been failing desperately though. If I’m being honest, it’s me, not the internet. There’s a ton of options, but I have been looking for something subtle and Google Search Results for “Subtle Sherlock Holmes pillows” does not actually locate much of anything.
Then I thought I found the answer. It was like the internet angels sung it out to me. AHHHHH OOOOH, it’s Spoonflower.
Ugh. Not that easy internet. Not that easy. Y U Got to Go and Trick Me Like That?
There are plenty of great tutorials on their site and a few Google searches pulled up some interesting tips, but after struggling with this thing for hours, I thought I’d share some of my observations with you. If for no other reason than you can hopefully save yourself an hour or two. (Once my swatches show up, I’ll share those too.)
Here’s five tips for avoiding disaster and designing wonderful textiles on Spoonflower:
1. It’s easier to create the single design and then let Spoonflower do the work of repeating the pattern. Take my “Where’s My Deerstalker?” graphic above. I had originally tried to create a brick pattern on my own, but after struggling with it for hours and uploading literally 11 different versions, I gave up on my own concept of the layout and let Spoonflower do the hard part for me. If you have never had to make a pattern before, it is a lot harder than you think. I learned that lesson the hard way.
2. If you upload a JPG, expect the colors to change. I had no trouble with PNGs, AI, PDF or EPS files. I am not sure if a compression would have helped, but since we’re printing high resolutions, I didn’t want to take that chance.
3. Let Spoonflower do the scaling for you too. A handy little trick within the interface is the ability to make the print larger or smaller with the rulers giving you a guide for scale. If you start with a relatively large design, you should be able to get it to the right proportions.
4. Don’t forget to adjust the image on your test swatch. This fabric isn’t cheap. Skip the fat quarter and get the test swatch for $5. You can adjust the crop of the swatch as well, so be sure you are getting a visual of what you really want.
5. Think about using the service for small projects too. I get some of my best ideas from trolling the awesome work of others. I loved this concept from blogger Armommy, who came up with a design that would make 8 hand warmers and then used Spoonflower to make the project available to her readers complete with printed instructions included on the fabric.
Have any of you used Spoonflower before? Have you been happy with the results?
 Amy Butler’s new Lark collection is now available for pre-order on Fabric.com for $8.98 per yard, however, stack these savings to get it as low as $6.63 per yard. That’s a savings of 34% off of retail price.
Here’s how you do it:
1. Order at least 4 yards to meet $35 free shipping requirement. You need to order 4 yards to get the price down to $7.73 OR 8.5 yards to get it down to $6.63.
2. Enter coupon code “SECOND” for $5 off any order OR if you want to order more than 4 yards, there’s also a current coupon code for $20 off $75 “PLTRY113”.
3. For a 4 yard order, this brings the total to $30.92 (free shipping sticks!), making it $7.73 per yard. If you order 8.5 yards to meet the $75 requirement for the second coupon code, your order will come down to $6.63 per yard.
The pre-orders are due to ship before the end of October according to the website.
(Note: I wasn’t able to stack these, but let me know if you successfully stack.)
Remember that dream you had a few years ago? That one where you changed your industry by taking a chance? And creating something new? Imagine that dream was now your full-time job. A flourishing business creating beautiful products that people everywhere wanted. Well, that’s the real story of how Cloud 9 Fabrics became a reality for this week’s Lady Geeks: Gina Pantastico and Michelle Engel Bencsko.
The principle behind Cloud 9 is simple and noble: to bring eco-friendly fabrics to the quilt and craft market.
How do they do it? They use only 100% certified organic cotton as their cloth base. On top of that, they use eco-friendly dyes and printing. They’ve developed close relationships with their mils in India to try and implement organic cotton farming and eco-responsible print and dye methods.
All those details about making environmentally friendly fabrics truly shed light on a rather huge reality: much of the fabric and textile market is a hugely wasteful industry. It’s about time someone try to change that.
In addition to being totally eco-chic, the fabrics are fantastic. And did we mention affordable? The upcoming (releasing Sept. 2011) Across the Pond collection and the currently available Nature Walk line are whimsical, colorful and just plain fun.
Want to get your hands on some of their fabrics? Watch their site for occasional half-pound and one-pound scrap bags. And of course, check out their blog for easy tutorials and patterns. This IKEA lampshade Hack is one of my favorites.
Pantastico and Engel Bencsko are not just great business women, they’re leaders in their field. For that, they’re fitting Lady Geek(s) of the Week.
Courtesy of Amy Butler, we present to you a new necklace pattern that takes advantage of her new Rayon prints. However, this could easily be translated with any fabric that you might have lying around. She provided it to her Facebook users as a downloadable PDF, but we thought we’d share the main points here for those that don’t want to download it.
You need: ½ of 58" wide fabric cut into 7 individual 2" strips. One strip should be 58", the rest can be varied. One spool or coordinating thread.
Here’s the summary of the instructions from inside the PDF:
1. Fold each strip in half lengthwise with RIGHT sides together and sew a ¼" seam. Backstitch each end. Turn them RIGHT SIDE OUT and press flat.
2. Make 1 to 5 knots on each strand in various spots.
3. On the 58" strand leave 21" without knots and place one end 15" from the first. Stitch together to create a “tail” and backstitch. The tail piece will cover the raw edges.
4. Overlap each of the 6 strands by ½" and sew together.
5. Stack all the strands with the 58" strand on the bottom. Wrap the tail around the strands until your wrap is about 3" across. Fold under the raw edge ¼" and hand-stitch.
It’s that easy! You could use this for any leftover shirts too… so get creative!